
Henry Quach
Optical EngineerHolographic Chocolate
Scope of Study
Holographic chocolate has been explored pretty extensively in optics outreach as well as pop dessert-making videos on the internet. However, I wanted to explore this from the point of view as both an amateur baker and optical scientist. I felt that my formal training in mechanical and optical engineering would have something to offer to this evolving process art.
The gist of this scientific chocolatiering is that when melted chocolate is poured onto a surface, it inherits the negative structure of that surface. If the pour surface is a grating, which is a periodic structure with micron-scale rows of linear grooves, the chocolate inherits the emergent property of coloration under polychromatic illumination. As a result, the chocolate surface also diffracts or angularly disperses incident light by wavelength. My study eventually produced the visually-rad results in Figure 1.
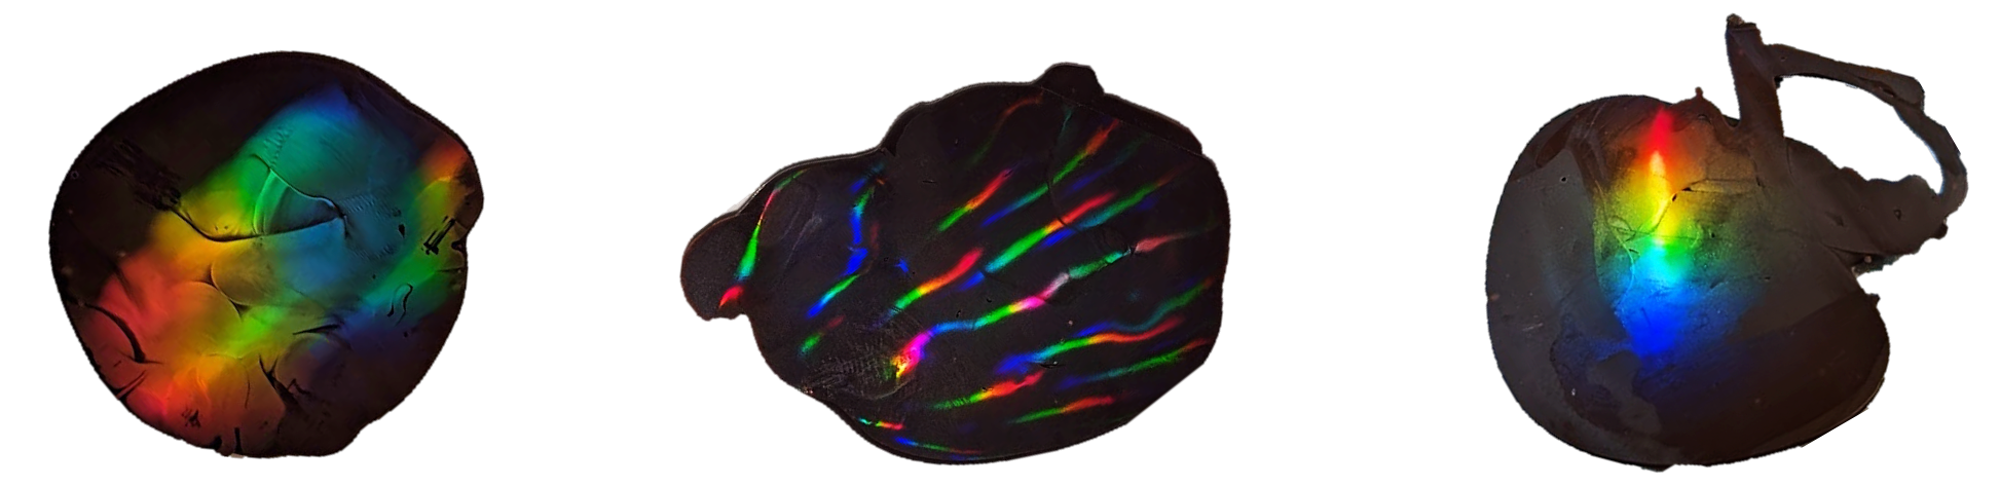
Figure 1. Final chocolates: These solid chocolates have no additional material applied to their top surfaces. Their composition is purely 60% Cacao Ghirardhelli Baking Chips", which I chose for their reliable cacao butter content. By illuminating the chocolate's surface relief with polychromatic white light, light is separated into groups as a function of wavelength, creating the cool rainbow effects. From left to right: matte reflection with a 1-axis grating blank, specular reflection with a 1-axis grating blank, and specular reflection with a 1-axis grating blank.
It was quite the experience to create diffractive chocolates that not only looked good in my kitchen, but also looked good when brought to school or work to share. This will be a particular problem for Arizonan bakers, who face 105 \(^\circ\)F temperatures in the summer daytime. Set on making visually-appealing and delicious chocolates for my colleagues anyway, I put forth the following goals for the chocolate study in the next table.
| Qualitative Requirement | Translation |
| Performance: Delectibility | Compact, reasonable number of calories |
| Performance: Appearance | Specular surface finish, not matte. |
| Survival: 🔥🔥🔥 | Will not melt during 23 minute drive from East Tucson to Oro Valley. |
I was able to achieve my goals but I did have to put a lot of thought into the process engineering to make it happen!
Some Background on Plastic Diffraction Gratings
Since Fraunhofer first developed its theory in the early 1800’s, diffraction gratings have become ubiquitous in systems such as spectrometers, astronomical observatories, and the National Ignition Facility. More compact than similarly-functioning prisms, incident light upon a grating disperses into multiple discrete orders due to the wave nature of electromagnetic radiation. Clasically, the constructive interference condition in gratings is defined as: $$d(n_{src}\ \text{sin}\ \theta_{src} \mp n_0\ \text{sin}\ \theta_m) = m\lambda$$ Based on their periodicity, reflective or transmission structure, and angles of incidence and diffraction, these holographic optical elements (H.O.E.'s) can achieve high efficiency and resolving power for a given spectral range. Traditionally, gratings were manufactured by using a leadscrew-driven carriage to drag a hard, sharp tool into a shallow blank. Called ‘burnishing’, the fundamental action is not ‘cutting’ via shearing, but rather, plastically deforming a shallow surface by sliding contact. Today, interferometrically-guided engines still burnish grating profiles and follow a burnished master grating to replicate grooves.
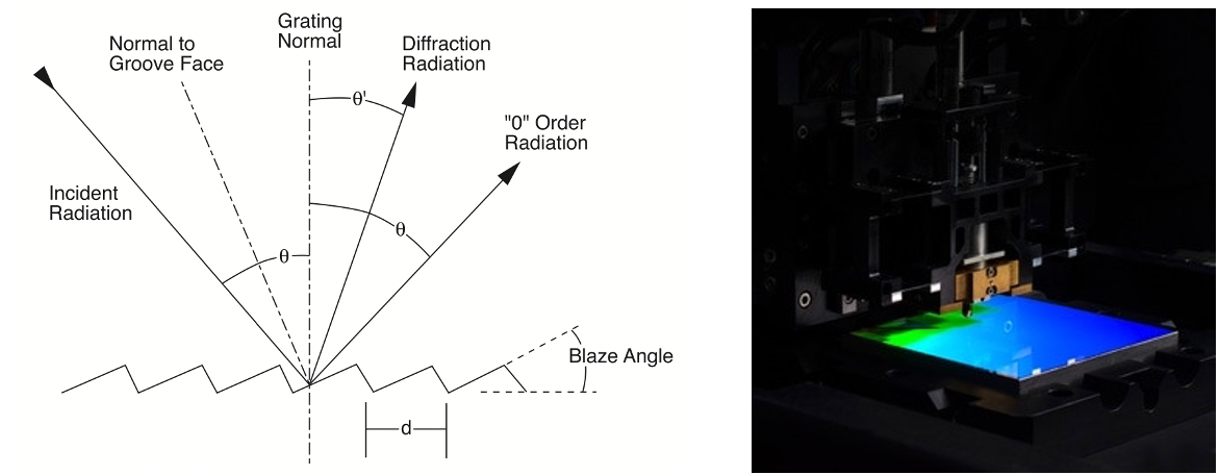
Figure 2. The physics of the grating are governed by their structure. Because the features of the grating are on the same scale as that of the interacting wavelength, variation in wavelength will lead to variation in the interaction with the grating microstructure. The left subfigure (from Thorlabs illustrates the geometry of a reflective blaze grating, while the right figure shows a grating ruling engine from OPCO.
In more recent embodiments for outreach and recreation, polyvinyl acetate gratings have been mass-produced (molded) from a master holographic pattern for low-cost and public accessibility. Today, the Reseda-based manufacturer Rainbow Symphony produces a large number of polyvinyl acetate grating products such as diffraction glasses and rainbow catchers. Purchased from their website, large flat sheets (6" x 12") are only ~$2 per sheet, which has been made crucial for their unexpected use in scientific chocolatiering. I purchased both gratings pitches available: 1-axis 1,000 lines/mm, and 2-axis "13,500 lines/mm". Optical engineers will note that a pitch of 13,500 lines/mm is likely inaccurate because this is on the scale of 75 nanometers. More likely, this means 13,500 features per mm^2.
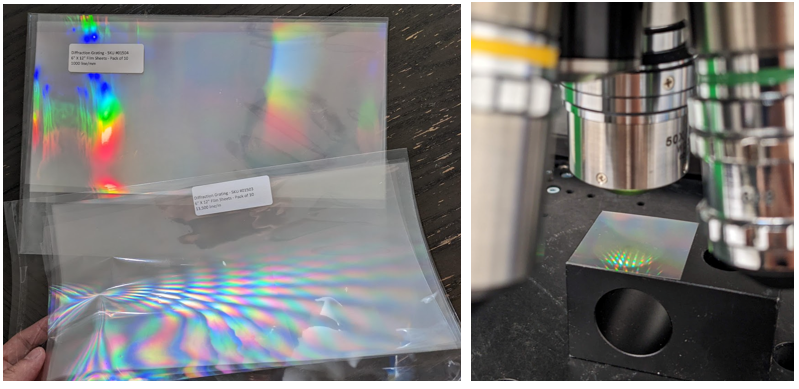
Figure 3. Diffraction sheets with molded grooves, 1-axis above and 2-axis below. A square sample of the 2-axis diffraction was illuminated by the illumination path of a 50x microscope objective.
To sate my curiosity of what the 2-axis grating looked like, I put it under the vertical scanning interference microscope. The microstructure is apparently a grid of dots.
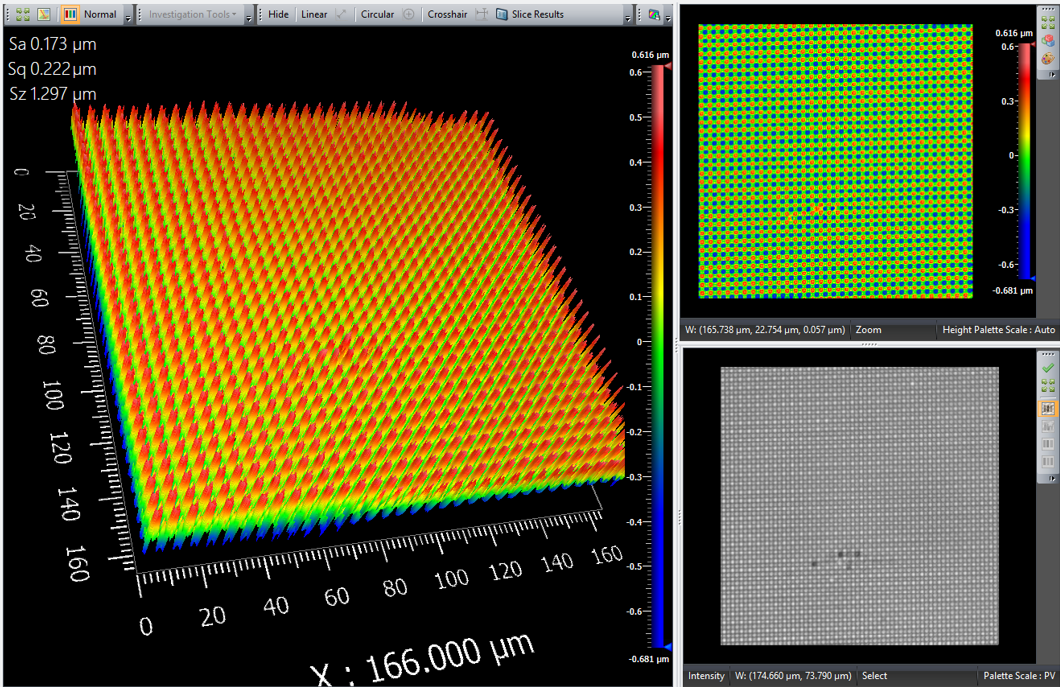
Figure 4. "13,500 lines/mm^2" gratings from Rainbow Symphony. Measured on the Zygo White Light Vertical Scanning Interferometer with an infinity-corrected 50X objective. The field size seen by the microscope is 167 x 167 \(\mu m^2\).
Theory: Chocolate Material Science
The material science of tempering chocolate comes down to the phases of the cacao butter. Cacao butter has 6 phases, of which, the fifth \(\beta_2\) phase is most desirable. This is the phase that "melts in your mouth, not in your hands", and has a satisfying snap. This phase is unlike the four prior phases which are matte, dull, and soft. Most chocolate you'll find at See's or the supermarket will have the cacao butter in the \(\beta_2\) phase already.
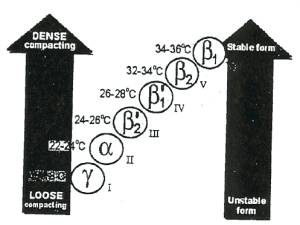
Figure 5. Cacao Butter Phases . We are interested in Phase V, or \(\beta_2\) crystal-dense chocolate. It is entirely possible and entirely likely that a body of chocoalte will contain multiple phases. When one phases exists and is not actively agitated, it will begin to nucleate and propagate crystal formation of that particular phase. It is our objective to seed as many \(\beta_2\) crystals as possible and allow that to become the dominant species in the finished chocolate.
So our strategy is this: we will heat up 200 g of dark chocolate chips up to 120-130 \(^\circ\)F in order to melt all six phases of the cacao butter into a thermally-homogeneous, unburned liquid. The chocolate chips will sit in a metal mixing bowl above a pot with boiling water. This is known as a double-boiler configuration. Next, we will remove the mixing bowl from heat and immediately throw in 100 g of the chocolate chips into the mix, while constantly agitating the mix with a spatula. The purpose is to bring the chocolate liquid down to 82\(^\circ\)F-84 \(^\circ\)F, where many \(\beta_2\) crytals will form, but avoid the formation of any of the less desirable phases from 84\(^\circ\)-120\(^\circ\). Finally, we bring the chocolate up to 88\(^\circ\)to decrease viscosity. The chocolate can now be poured onto a surface for cooling and nucleation of the Phase V cacao butter crystalline stucture.
Fabrication I: Materials
I chose Ghirardhelli's 60% cacao baking chips because they tasted good and contained only cacao butter, sugar, cacao particles, and lecthin emulsifier. Some 'melting wafers' are easier to melt and obtain 'shiny' solid forms with a satisfying snap, but these in fact, do not contain cacao butter, and instead, hydrogenated fats. It was an easy choice.
The next critical items were an OXO precision coffee scale, Nordicware aluminum baking sheets, and a ThermoWorks DOT with a Type-K thermocouple accurate to 1.8 \(^\circ\)F. Initially, the smaller 'mounted' double boiler was put into my pot, but its size later proved to be problematic.
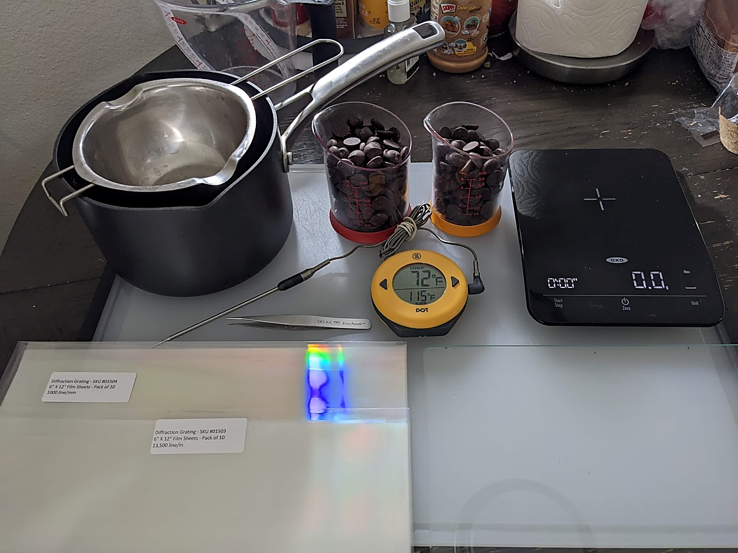
Figure 6. Items required for the operation and experimentation.
Fabrication II: Tempering and Thermal Homogeneity
Melting was astonishingly quick. After the pot was brought to boiling, the top mixing bowl was placed atop and the chips poured inside. Within 20 seconds, the dull chocolate chips (from abrasion during shipping) became specular. The melted pool was quite satisfying to watch. The probe thermometer noticed a gradual transition from 80 \(^\circ\)F to 100 \(^\circ\)F, but very sharp spikes to 120, 130, and 140 \(^\circ\)F if I was not viligant. Despite spikes to 140 \(^\circ\)F, I did not notice any deleterious impact on the chocolate.
At the unitary 6-phase melt temperature, the boiler was removed and constantly agitated for about 15 minutes. I just watched youtube videos while waiting fo the the chocolate to hit 84 \(^\circ\)F and had to keep switching hands because agitation was somehow tiring. During one trial, I timed the temperature transitions to see if the thermal cooling to room temperature was gradually slowing. Thermal conduction is directly proportional to the difference in body temperatures, so I expected cooling to decelerate. However, it didn't really decelerate all that much and was linear the entire time.

Figure 7. Melting process takes only about 2 minutes total. A spatula stirred the chocolate chips so that no particular region was burned. Stirring with the probe, the viscosity difference is very apparent between every 10 \(^\circ\)F heated.
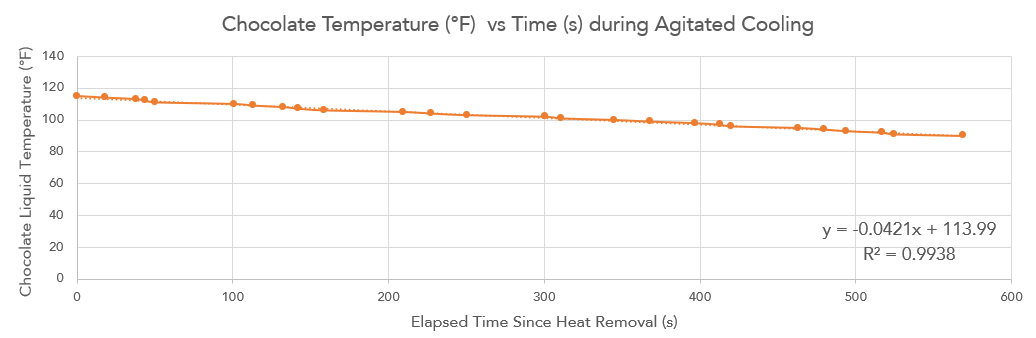
Figure 8. I timed the cooling of the chocolate during agitation with an OXO spatula. It felt like cooling took longer and longer, but looking at the graph, it was pretty linear.
I had a thermal LWIR camera on hand and took the opportunity to thermally image the melting pool of chocoolate. You can see the that the chips get red-hot, melt, and integrate into the macroscopic pool. The annulear edge of the pool was most hot because the bottom central aperture of the mixing bowl had silicone coating and insulating it.
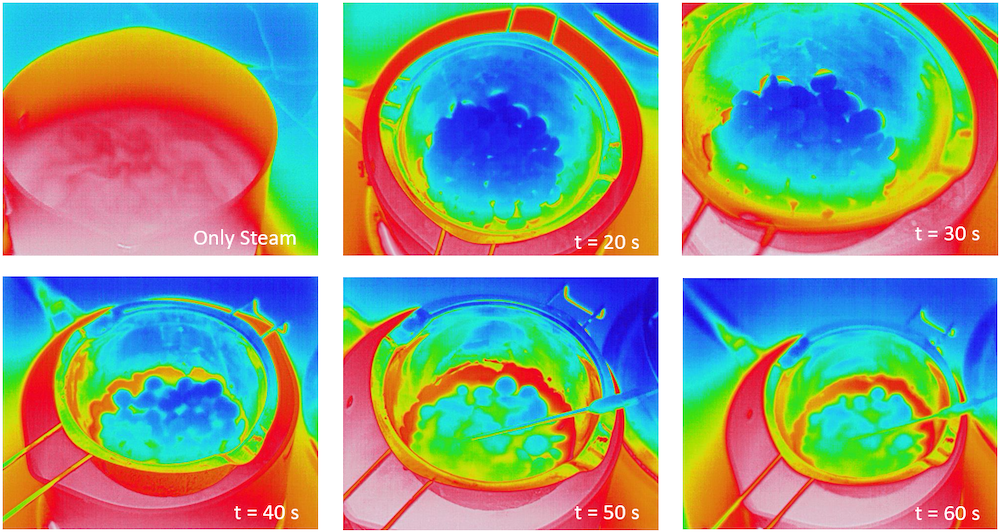
Figure 9. Thermal Imaging (LWIR, \(\lambda = 7 \mu m - 12 \mu m \)) to observe the uniformity of the melted chocolate pool. This trial was done without mixing so the melt was visually discernable. After 1 minute of static melting, I immediately put the camera down and started mixing as to not burn the annular edge regions of the pool.
Fabrication III: Grating Imprint Technique
There are multiple ways to impress the grating pattern onto the chocolate. Scouring the internet for viable techniques, I identified a few fun ones try out, which I named myself.
"Dip in the Lake" uses tweezers to dip and glide a grating coupon within the chocolate bath. The result actually had excellent grating transfer, but the the thin chocolate layer obtained was quite brittle and hard to remove. It didn't look as appealing as 'blocky' chocolate.
"Gravity Drop" was pretty simple in that a small spoon scooped up some of the chocolate lake and poured straight onto a grating. It was simple and quite controllable. You could compensate for non-circular splatter pretty easily.
"Reverse Grating Press" uses tweezers to push the grating on top of a pool of existing liquid chocolate on parchment paper. This worked well sometimes but lacked consistency. Gratings were not guaranteeda flat surface, so low order-surface shape dominated the texture and sometimes mechanically interfered with the grating sheet removal process.
Finally, the "Almighty Smear" is identical to the "Gravity Drop" technique, but uses the spoon to press down on the chocolate pool. Unfortunately the grating tended to adhere to the chocolate and the chocolate to the spoon, so this was a patent detraction from the limited time we had for pouring the delicately tempered chocolate.
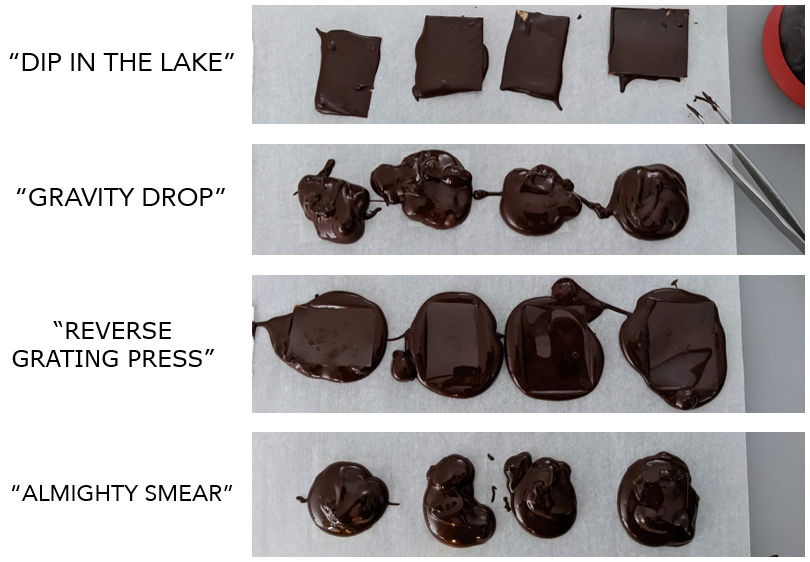
Figure 10. Attempts of getting the structured pattern onto the melted chocolate. The "gravity drop" method was the clear winner due to its simplicity, efficacy, and time efficiency. All following photos of holographic chocoalte basicaly use the gravity drop method.
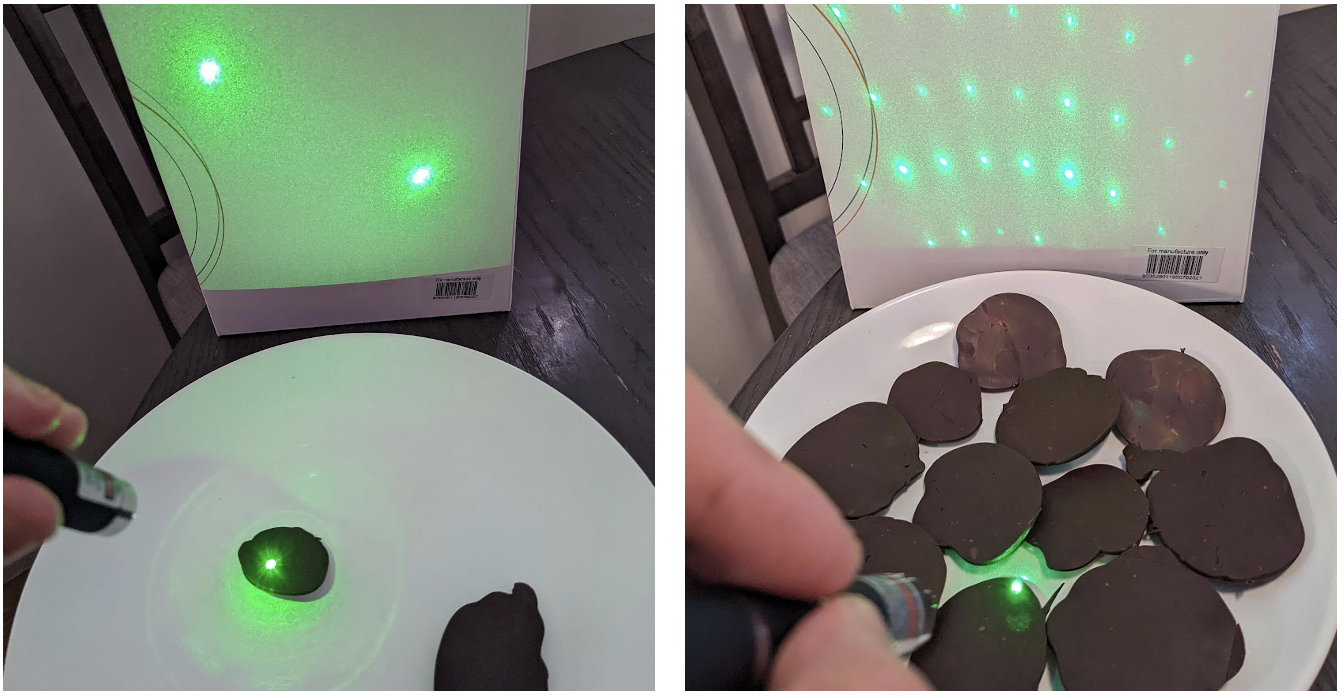
The finished chocolates indeed inherited the desired grating negative pattern, as shown by the diffracted spots in Figure 11.
Figure 11. Diffraction patterns of one sample each, with a 532 nm laser.
Failure Mode I: Condensation Seize
My first failure was my failure to realize that the top boiler had to be larger (and ideally completely seal the outlets of the bottom boiler with water). This is because the escaped steam condensates onto the mixing spatula or settles into the top boiler itself. I learned this the hard way. The table below (info from fooducation)elucidates the polarizing relationships between each chocolate ingredient and water. You can see how it easily gets out of hand if water content is even so slightly altered.
| Ingredient | Relationship with Water |
| Cacoa Butter | Hydrophobic |
| Sugar | Hydrophilic |
| Cocoa Particles | Hydrophilic AND hydrophobic. |
| Lecthin Emulsifier | Hydrophobic AND hydrophilic |
| Water | Homewrecker |
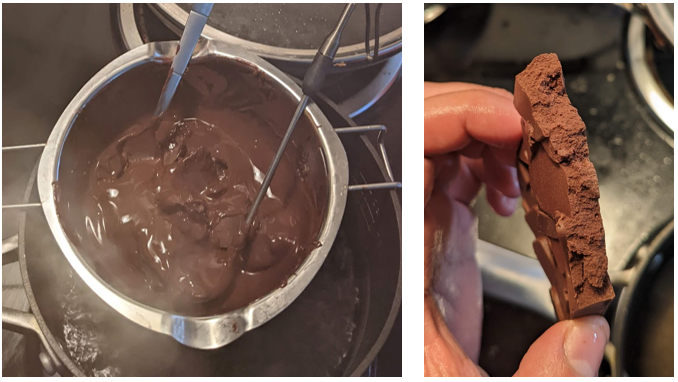
Figure 12. Effect of extra condensated water: the mixture becomes rather clumpy and when molded, the grainy texture of the the chocolate cross section clearly doesn't look like it broke cleanly. The chocolate is 'bendy' and the tempered nature we wanted was not evinced.
Failure Mode II: Grating Side Disambiguation
The next failure mode is in correctly disambiguating the grooved side of the grating. In transmission, it's different to tell which side is which. If you bend the grating into a convex cylindrical form, you can just barely tell that the reflection of an illuminating source comes back stronger than the reflection of the opposite side. This ghost effect (showing the stronger image of the source) tells you that you are facing the smooth side and need to put chocolate on the other side. From the grating side, the diffraction is slightly more apparent, but it's the lack of the specular ghost that's the smoking gun. Interestingly, some bakers advocate for scratching both surfaces with your fingernail to tell the sides apart. While horrifying from an optical engineering standpoint, it totally works and your fingernail can feel the grooved texture from the lackthereof.
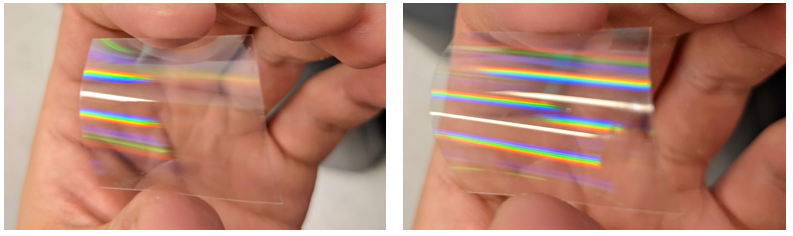
Figure 13. Both sides of a 1-axis grating are shown against an illuminating lamp. The left is the grating side facing the camera and far fewer ghosts. The one on the right shows ghost reflections.
Failure Mode III: Face Cooling
The third failure mode one can encounter is not placing the cooling grating assemblies onto a cooled plate. Anecdotally, it seems that leaving the cooling chocolate at room temperature doesn't yield consistent surface patterning results. When you peel off the final grating, some regions are diffractive and some are not. Intuitively, this might be because a slow gradient rather than rapid quench will allow transient cooling effects to gradually cool the material interface uniformly. If not, the diffraction effect is merely zonal. We want the entire negative grating surface to be solidified all at once. I used an aluminum sheet pre-refrigerated to 40\(^\circ\)F, and later, a pre-refrigerated sheet and pre-refrigerated gratings to enhance the cold shock and rapid cool.
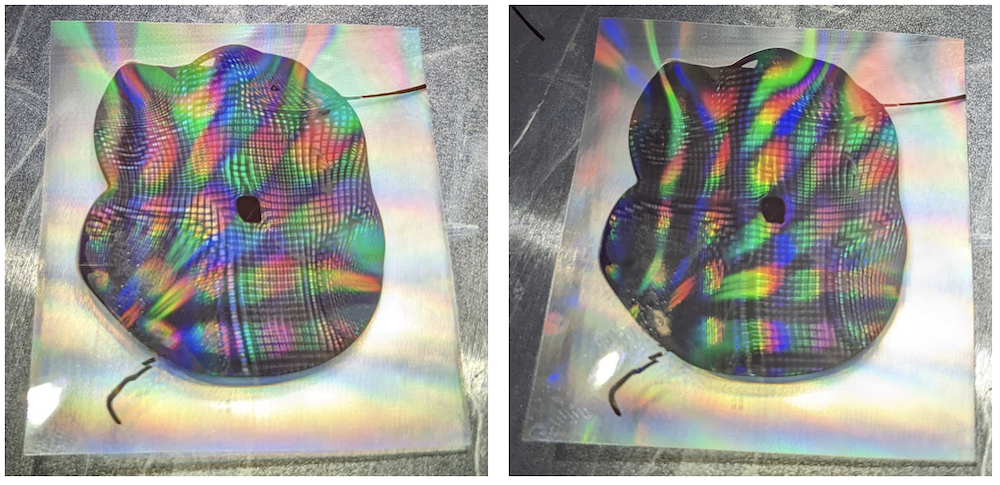
Figure 14. It looks like a disco party when the grating is still attached! I flipped gratings over while still cooling.
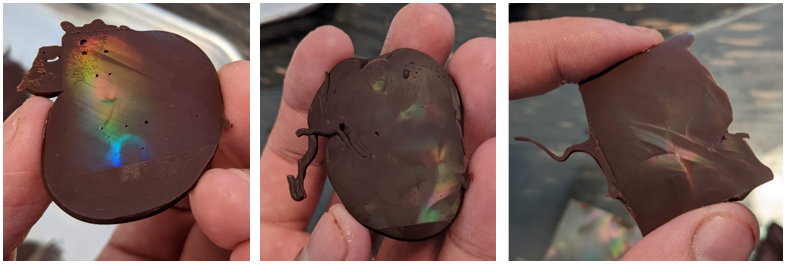
Figure 15. Face cooling samples with striations due to thermal gradient and lack of sudden temperature shift. Diffraction is region-dependent, or zonal. Differential cooling can smear the imprinted grating as it expands.
Failure Mode IV: Illumination Conditions
As all optical engineers know, accurate knowledge of the illumination source is literally as important as the design of an optical system itself. Under diffuse, Lambertian lighting, the diffractive chocolate doesn't seem diffractive at all! That's becasue diffraction gratings produce images of the source itself in different orderes, dispersed by color. If the light source is not spatially localized, distinct, or small, then of course the rainbow holographic pattern won't be visually stunning! In Figure 16, I show the difference between ambient light from the ceiling and the addition of a flashlight source to bring out the grating's functionality.

Figure 16. A large block of chocoalte for the 2-axis grating. We can see the apparent difference when shining a flashlight overhead vs ambient lights in the kitchen. This bit of chocoalte was rather large and kept warping, which is why so many fun swirls manifest.
Failure Mode V: Premature Grating Removal
A fascinating innovation is that you can wait for the differential thermal expansion of the grating (polyvinvyl acetate and chocolate have different coefficients of thermal expansion) to naturally peel off each other. This natural process is far more gentle than peeling the grating off the solid chocolate with fingers, which can take some of the grating structure with it.
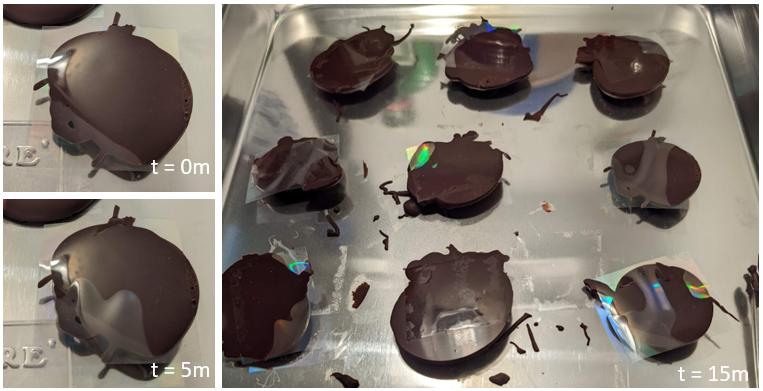
Figure 17. You can see how the grating peels itself off from one side over 5 minutes. This is most desirable. My best gratings saw little to no force required and the gratings were just 'on top' of the chocolate when I intended to remove them.
Failure Mode VI: Item Delivery
Perhaps the most important aspect of achieving my technical objetives, I refrigerated my finished diffractive chocolates on a plate, and placed them insulated a refrigerated briefcase before bringin them to work. I placed a conductive refrigerated aluminum baking sheet below this suitecase, and a insulated plastic cutting beneath that. This 'thermal stack' worked well enough such that diffraction grating chocolates survived the trip. However, the 2-axis ones were most suceptible to matte'ing and loss of diffractive efficiency. This is because their features are on such as small scale that the melting of their structure drastically impacts their perfromance. On the other hand the 1000/mm grooved chocolates were more immune to melt.
Figure 18. Process of taking this to the office. Success, at least for the 1-axis gratings.
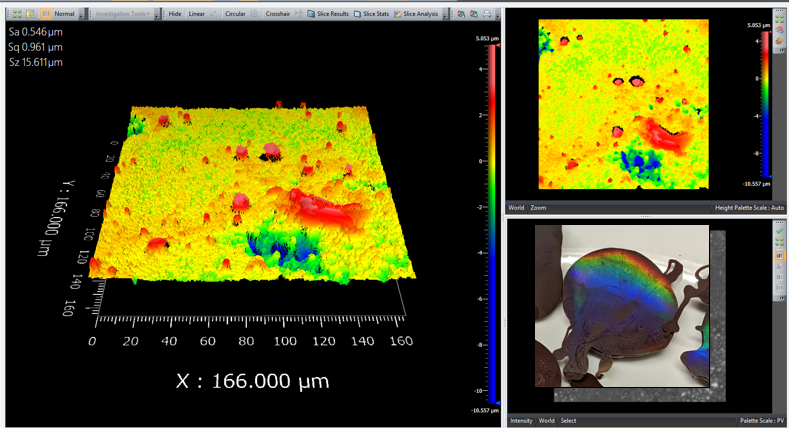
Figure 19. A look at the 2-axis grating under the white light after a 17-minute trip to OSC. Pretty gnarly, huh? But you can still see some of the dot-like features present.
Conclusions
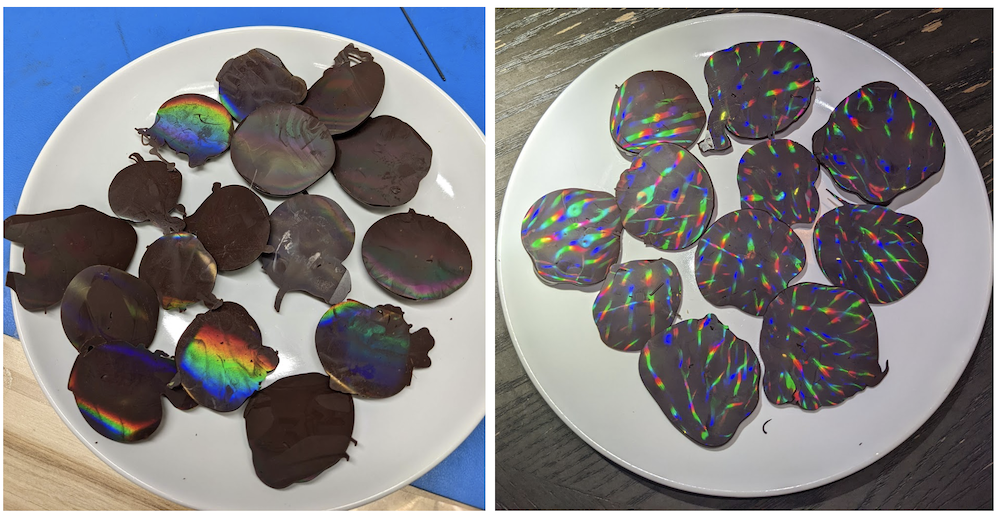
Figure 20. Plates with the 1-axis, and then the 2-axis holographic chocolates. Total time to temper, pour, and remove gratings was about 30 minutes. Taste, appearance, and survival requirements were demonstrably met.
This was a very satisfying project. I would highly recommend the 2-axis holographic chocolates if they do not have to be transported, because more diffractive effects are present under a directional light. However, if required for a communal function, 1-axis gratings are more tolerant to heat and surface deformation. At the office, I got a good reaction from optics-savvy peers and they loved the fact that gratings could be molded into such a thermally-sensitive substrate. 10/10, would make again.